How to fix search problems in Windows 10. Top 5 Ways to Fix Windows 10 Search Not Working. windows 10 start menu search not working
Windows 10 Search Bar Not Working
Windows 10 search problems are common for every user of windows 10. we are here to help you through a quick and easy guide.
If the search in windows 10 stops working you can easily solve the problem by troubleshooting in many ways. Here are some methods to solve the windows 10 fix problems.
In the latest update of windows 10 the Cortana search was replaced by a simple search option on the taskbar. Really It is very useful to search for anything on your PC easily and quickly by this option. It searches and finds you the document, files, etc… that you want very quickly. It also searches on the web through Bing.
Sometimes the search will not open, stop responding or may not show you the results. The error in opening the search is the most common issue for windows 10 users. It was the most reported problem by the users to the developers of Windows 10.
You may experience this issue when you have an error in installing a feature update. In this guide we will show you how to fix this problem in simple methods:
How to Fix Windows Search by Troubleshooting
Step by step to fix search bar not working in windows 10: This is the best and easiest way to fix the windows search problems. The built-in Troubleshooter will help you if the minor bugs have it. Just follow the below steps to know how to troubleshoot the Windows 10 using troubleshooter:
- Open the settings using windows key + I keyboard shortcut.
- Navigate to Update & security.


- Go to Troubleshoot option.

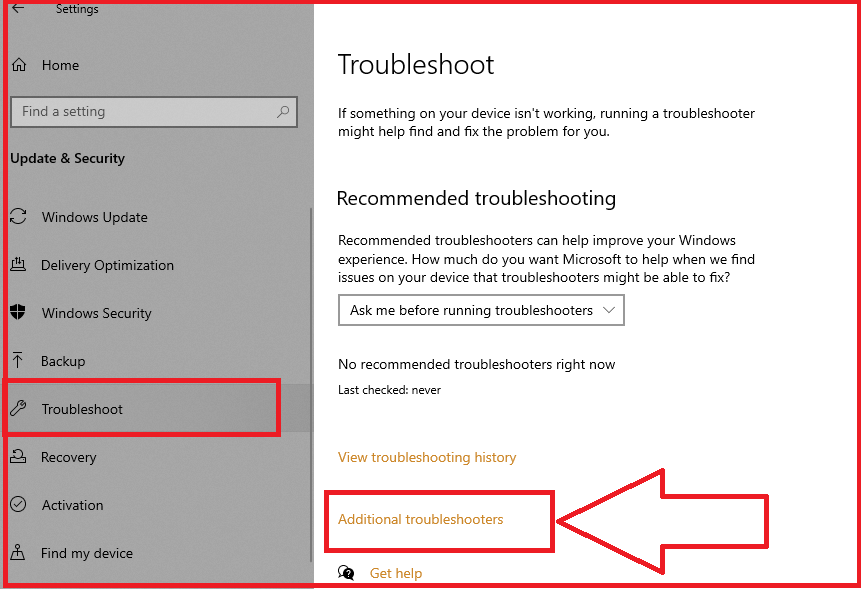
- Click on ‘Run the Troubleshooter’ under the ‘Search and Indexing’ option.

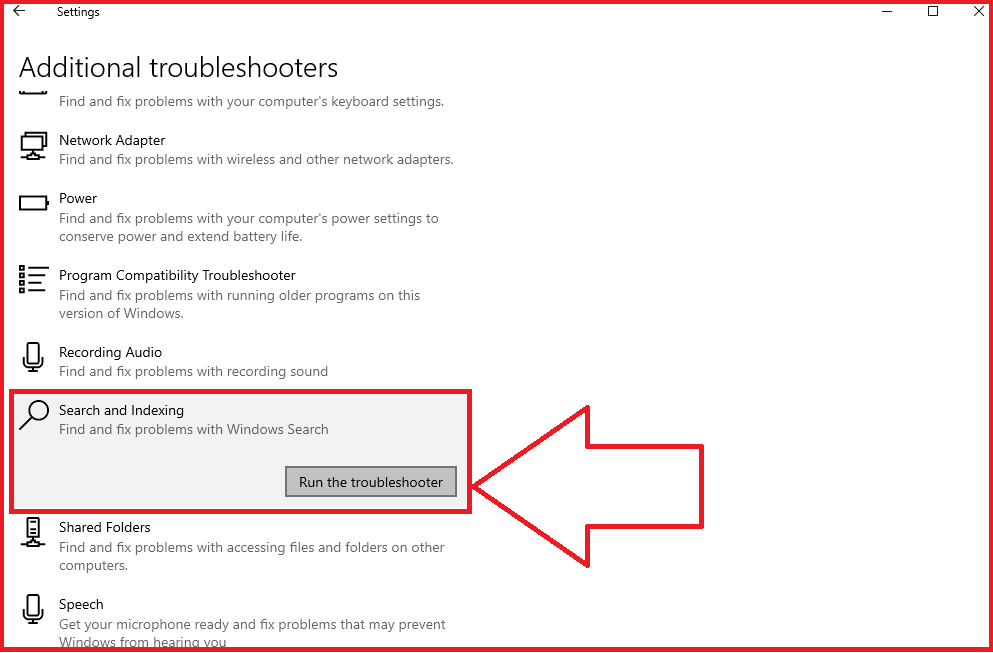
- Check the problems that you are facing with the search.

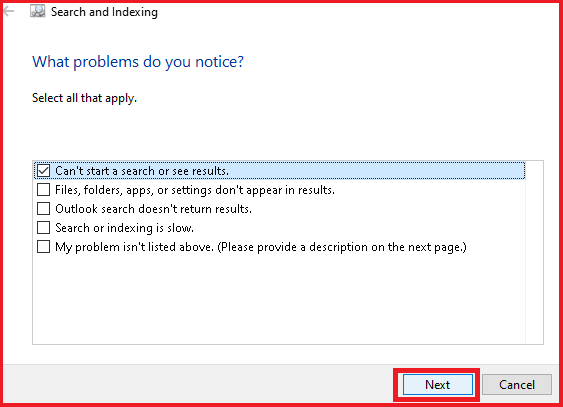
- Click on Next.
- Follow the directions as shown by the troubleshooter.
- Click on the Close button.
Once the problem was fixed, restart your PC and your Windows Search will run as usual.
You can also use the command prompt to run the troubleshooter. The steps show you how to do it:
- Click on the windows icon.

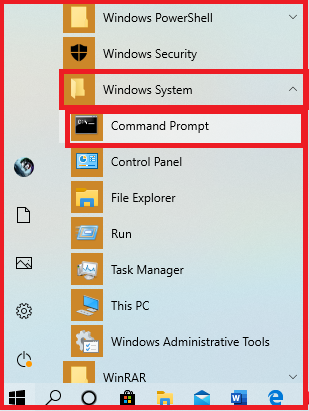
- Scroll down to find the command prompt.
- Right-click on it and run as an administrator.

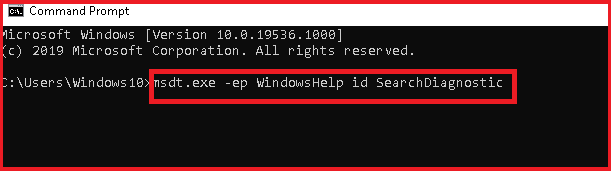
- Now type the following and press enter.
ep WindowsHelp id SearchDiagnostic
- Click on Advanced options.
- Select Apply repairs automatically.
- Click on Next.

- Same as above select the problems with the search.
- Click on the Next button.
After the process is done, restart your PC and the Search will work normally.
How to Fix Windows Search by Restarting
Restarting of the windows search UI may fix the problem. The below steps will help you to restart the windows search:
- Run the task manager using ctrl + shift + Esc keyboard shortcut.
- Click on Details Tab.
- Scroll down to find SearchUI.exe.

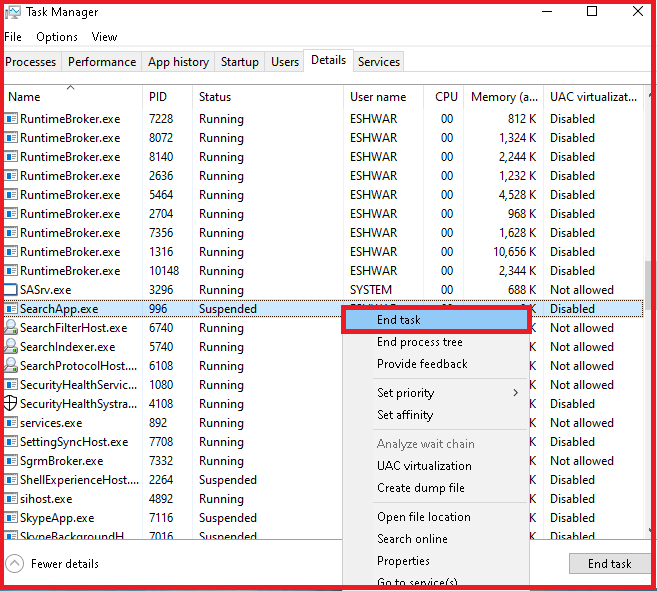
- Right-click on SearchUI.exe.
- Click on End task.
- Now select the End process option.
Once the process is done, restart the PC and check the search is working or not.
How to Fix Windows 10 Search by Updating
Windows update is necessary to fix the bugs and errors in the UI. So, to run the windows 10 PC smoothly you need to keep your PC updated. The updates can include fixes and more. You may solve the search error by updating your PC to the latest windows 10 update.
Follow the steps below to know how to update your Windows 10 PC;
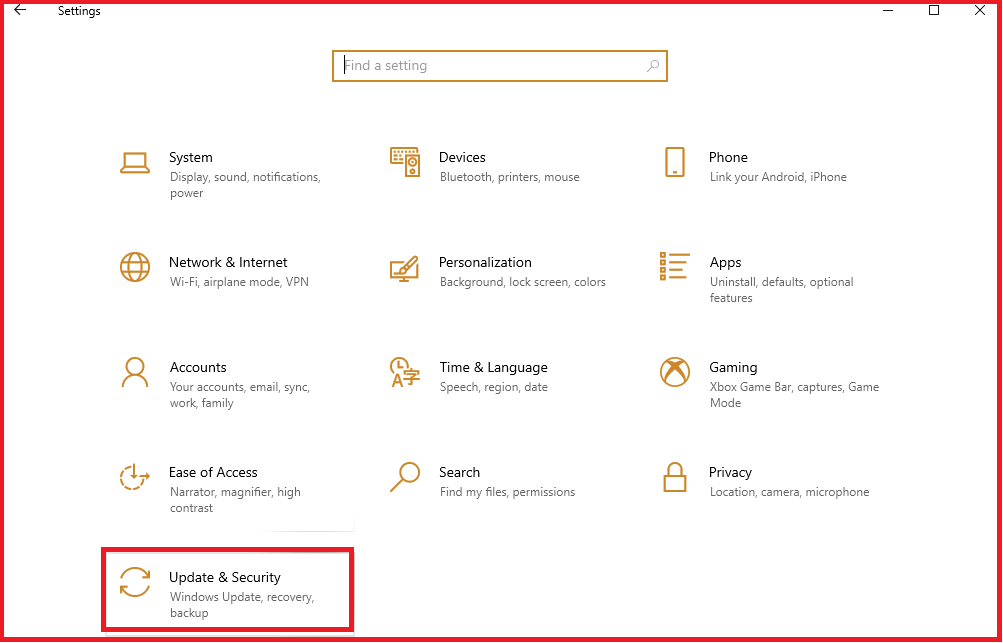
- Use Windows key + I keyboard shortcut to open settings.
- Click on the Updates & security option.

- Select Windows Update.
- Choose ‘Check for updates’ option to search for any updates available.

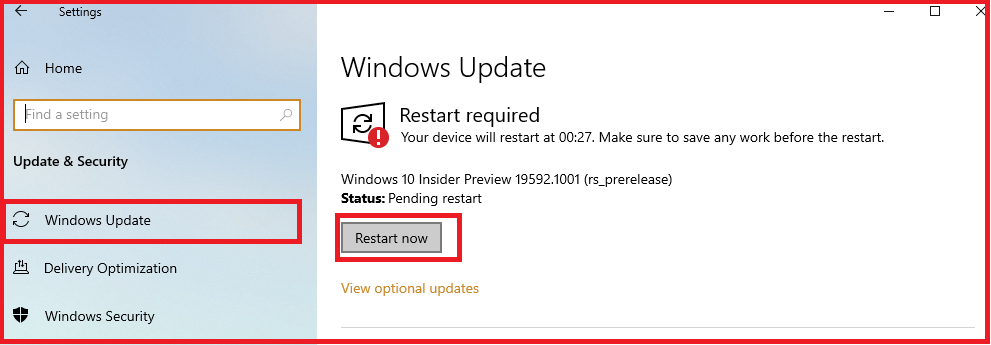
- After the downloading has finished click on the Restart button.
After the update has finished check it the search is working normally.
How to Roll Back To Previous Windows 10 Version
Glitches in search may occur by updating your PC to the latest version of the windows 10. So, rolling back to the previous version of windows 10 may solve the Windows 10 search problem. You can roll back or uninstall the latest windows 10 update.
Follow the steps to uninstall the latest update of the Windows 10:
- Click on the windows icon.
- Open settings.
- Select Updates & Security.
- Navigate to Windows Update.

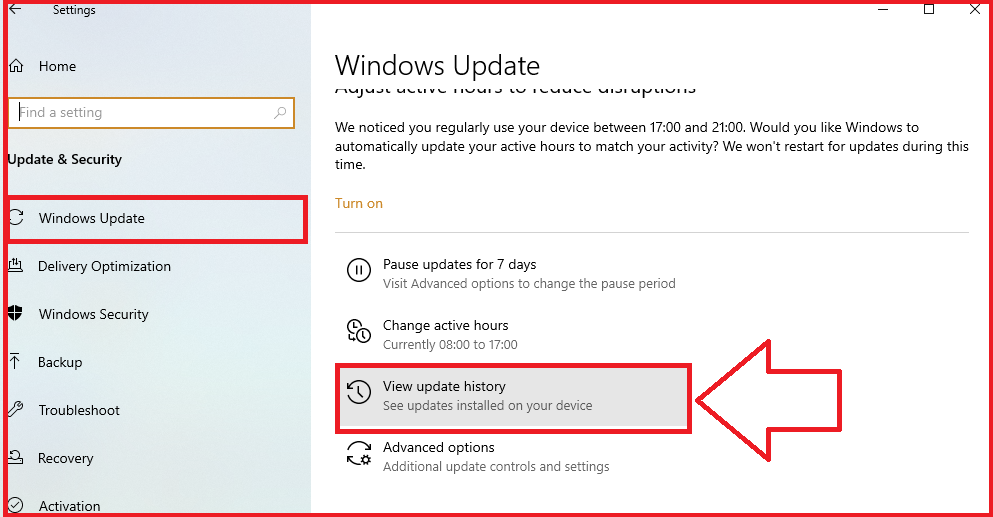
- Click on View update history.
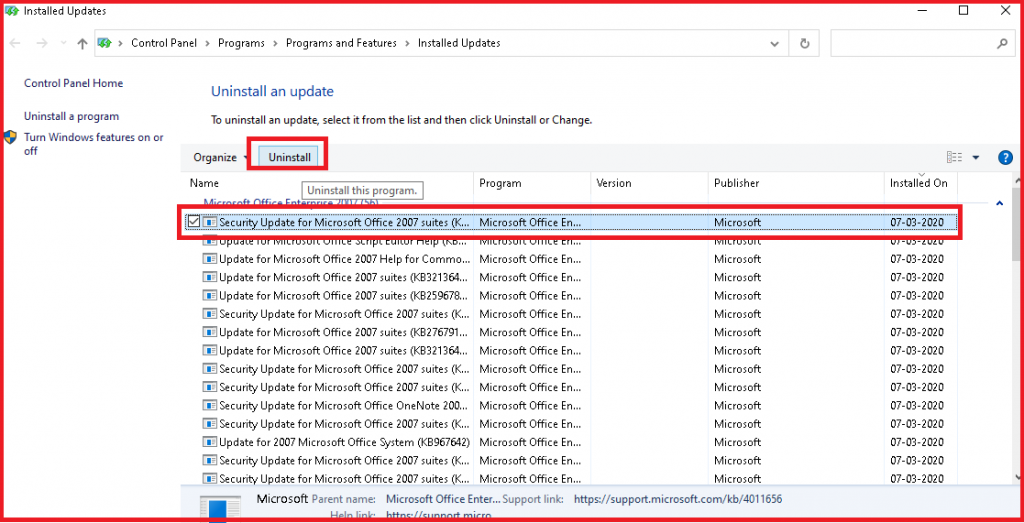
- Choose the Uninstall Updates option.

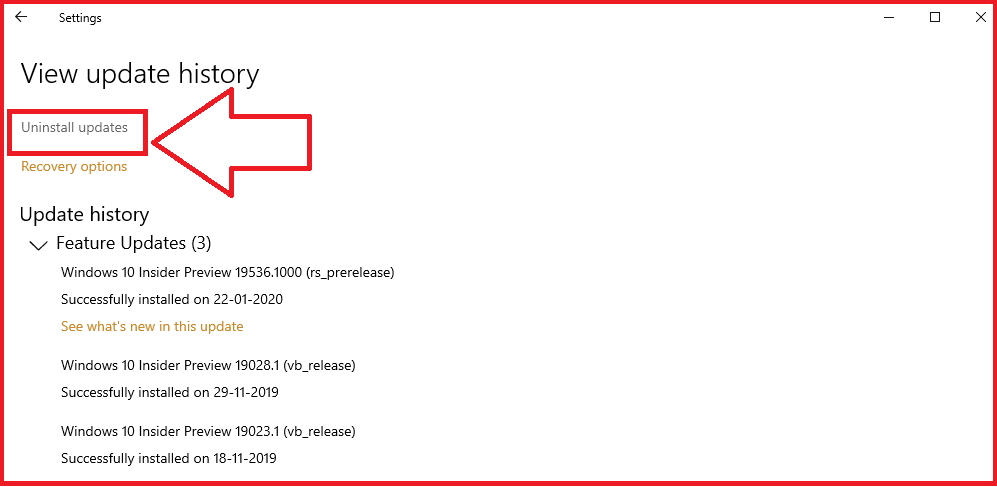
- Click on the latest update that installed on your PC.
- Now select uninstall.

- Click on Yes.
- Close the tab.
After the process, restart your Windows 10 PC to roll back to the previous version. This may solve the search problem encountered previously.
How to Fix Windows 10 Search by Resetting
If none of the above methods are worked then try to reset the windows search to solve the Windows 10 search problems. Follow the steps below to know how to reset the windows search:
- Go to windows 10 download center.
- Click on the download button under the Reset Windows Search Power Shell script.

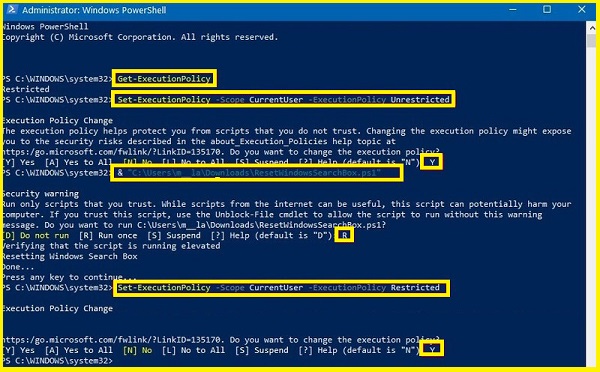
- Now right click on the script and select open with PowerShell.
- Type the following command:
Get-ExecutionPolicy
- Now press enter to execute the command.
- It will be redirected to another tab which may show Restricted. This may help you later.
- Now enter the following command and press enter to execute the command:
Set-ExecutionPolicy -Scope CurrentUser -ExecutionPolicy Unrestricted
- Type Y and press Enter.
- Type the following command and press enter.
- “C:\Users\YOUR-ACCOUNT-FOLDER\Downloads\ResetWindowssearchBox.ps1”
- Type R and hit enter.
- To see the original execution policy type the following command and press enter. -Scope CurrentUser -ExecutionPolicy Restricted
- Now type Y for Yes and press enter.
The search will work if you completed the steps above perfectly.
Try to restart your after all the methods are done.