7 Ways to take Screenshots in Windows 10 Laptop, with Built-in tools
How to Take Screenshots in Windows 10
Windows 10 operating system is the latest version of windows developed and released by Microsoft in 2015. Over the past years, this operating system has received excellent reviews from the users terming as an improvement from the other operating systems like Windows 8.1. You can take a screenshot on windows 10 without print screen
Microsoft had earlier released Windows 8 operating system but it was not positively received like Windows 10. With its advanced security system and ability to compress system files, Windows 10 has become one of the widely used operating system that many people prefer.
If you are a Windows 10 user then probably the challenge you have is how you can take a screenshot. A Screenshot is a photo taken of anything that is on the active screen. There are various reasons that can make you want to take a screenshot such as when playing your favorite game on your PC or desktop and you want to capture your achievements using a screenshot.
On the other hand, you may need to share something interesting on social media or you want to save an online document before you send to the recipient. Whichever reason you have to want to take a screenshot, Windows 10 is able to do exactly what you need. The following is a guide on how you can take a screenshot on Windows 10 operating system using built-in tools.
Use the Laptop Keyboard Shortcut keys: Windows + Print Screen
A print screen is often a bbreviated, as Prt Scn or Prt Scr, is they located in the same section where the break key and scroll lock keys are. The original use of the print screen key was to enable anything that was currently on the screen to be printed.
But, in the new generation operating system like Windows 10 it is used to save a screenshot of the current screen. When you want to take a screenshot of the entire screen and store it as a file either in the hard drive, press the Windows + Print Screen keys on your keyboard.
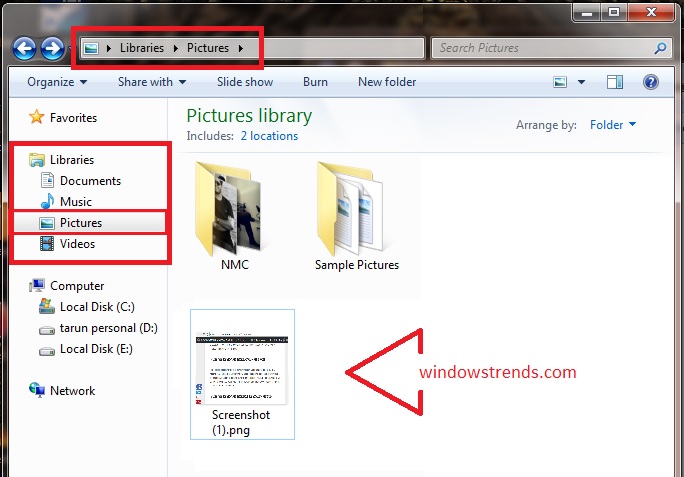
The screenshot will be stored in the pictures library in the folder named Screenshots and the file will be titled as ‘Screenshot (number xxxx).png,’ Remember, the number of your screenshot will be based on how many screenshots you have in the storage or you have taken.
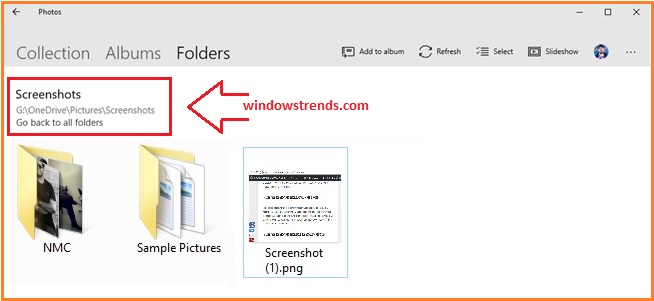
To locate the screenshot in Windows 10 using the photos app, go to ‘Folders then to pictures and lastly to Screenshots.


Use the Keyboard Short: CTRL + PRT SRCN
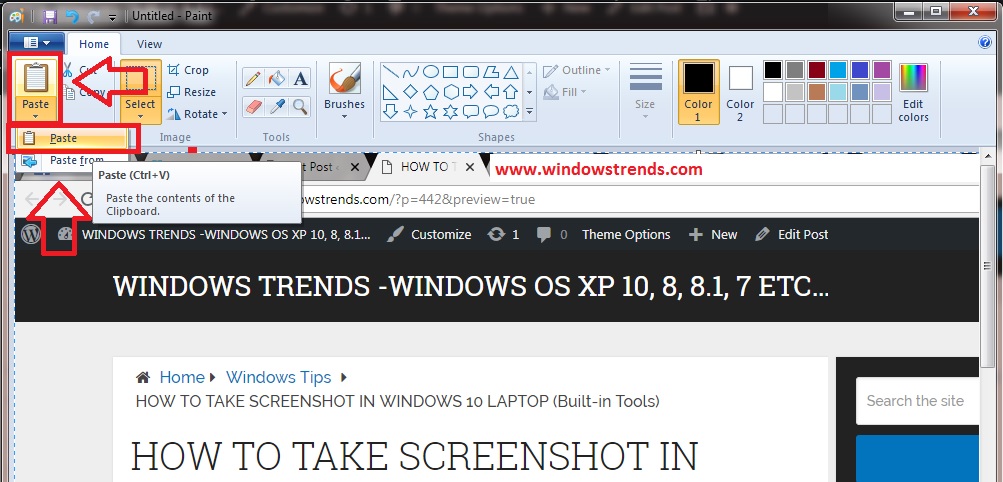
It is one of the easiest way to take a screenshot is by using the print screen key or by pressing the Control + Print Screen keys. Windows will take the screenshot of the whole screen and save it to the clipboard. However, in this case it is not stored on your hard drive as a file. To save it as a file, open a program like paint that is able to edit images and then paste it here from the clipboard.


Use the Keyboard Shortcut keys: Alt+ Prt Scn
Windows 10 gives you an opportunity to take screenshots of the active window. To do that, ensure the window that you want it captured is open and then press Alt + Print screen keys on your keyboard.
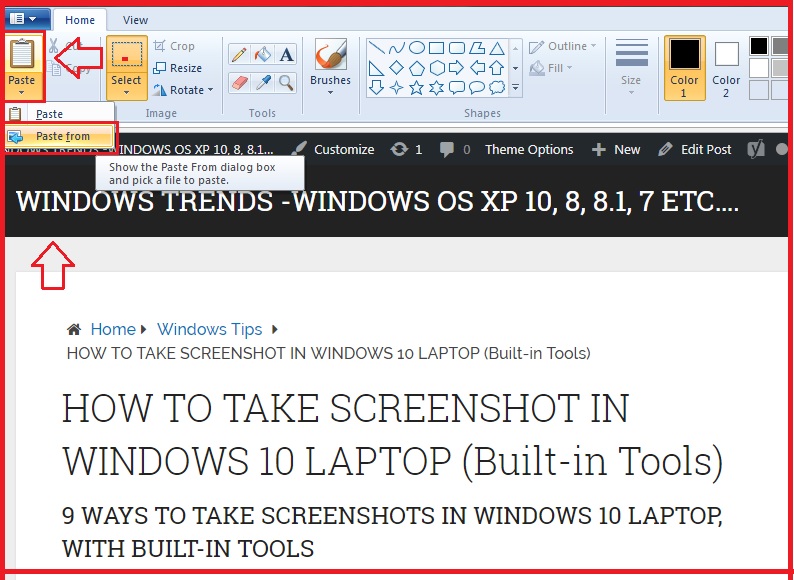
The screenshot will then be saved to the clipboard. Open an image-editing program such as Paint or any other photo software and paste the image of the screenshot here in order for you to make changes and save it to your Windows device.
Use the Shortcut Keyboard keys: Windows + Shift + S (Only for Windows 10 OS)
Windows 10 is an advanced operating system that makes it easy for you to take screenshots every time you need to. In this case, press Windows + Shift + S for to capture an area of your screen and then copy it to your clipboard.
You will see that after pressing these keys, the screen will dim and the cursor will be available for you draw the region that you want to capture on the screen. Select the area that you want by drawing using the cursor and then let go of the mouse cursor.

The screenshot taken will be saved on the clipboard. Open any photo-editing app like Photo scape or Paint to paste the image the screenshot and then you can edit and save it.
Use the Keyboard Shortcut: Windows + Alt + PRTSCN
This feature can be used only in Windows 10 Creators Update. Microsoft has invented new elements that games love such as a new Game Bar. With this Game Bar one take screenshots of the current game window. Meanwhile, gamers can press the Windows + Alt + Print screen keys and then in an instant a screenshot will be taken.
The screenshot will be saved on your windows 10 Pc in the video library. The file will be named based on the game that one was playing, the date and the time when the screenshot was taken.
Use Hardware Buttons
There are other Windows tablets devices such as an Asus, Microsoft Surface, or Dell Venue that do not have a keyboard with print screen key and therefore, it will be impossible for you take a screen especially if they are touch screen. The quickest way to do it in case of such a situation is to use the hardware buttons on your device.
Press the Windows logo and the volume down key at the same time for you to take the full-screen screenshots. To be sure that you have taken the screenshot, you will see your screen dimming indicating that a screenshot was made. You can locate the screenshot in the Pictures library under the Screenshots folder.
Using the Snipping Tool
The Snipping tool is well known tool that has been part of Windows that was included in Windows Vista. Nevertheless, this feature has been discovered to take screenshots on Windows 10. It can make screenshot either of the whole screen, a free-form region, or only the rectangular area.
You can find this tool after pressing the Start button, and then to All Programs, open the Windows Accessories, and then you will get to the Snipping Tool. To start using the Snipping tool you should first click New for you to begin taking the screenshot.
You can also locate the snipping tool by searching it in the Start Menu search box. This Snipping Tool enables you to create and edit screenshot at any time. There are main buttons that you will use when using the Snipping Tool.
The Mode main button on Windows 10 will enable you choose the type of screenshot you want. The Delay button is to delay the screenshot capture for about 1-5 second based on what you selected and the Cancel button is there to allow you cancel the active action. Lastly, The Options Button enables you to customize your screenshot in whatever aspect you need.
Things to Note
You may find either a tablet or laptop with the Fn key on the keyboard. The Function key acts as a modifier to activate a second function on your keyboard. It is also used to control other hardware functions like screen brightness and speaker volume.
Therefore, in laptops and convertible gadgets that have the Function key, the process becomes even smoother. Use the following shortcuts on your keyboard:
- Function (Fn) + Print Screen Keys.
By pressing, the above keys you are will take the screenshot of the entire screen and copy it to the clipboard.
Function (Fn) + Windows + Print Screen :
Just like pressing the Windows + Print Screen keys on a standard keyboard, it enable you to take the screenshot of the whole screen and store it as a file on the hard drive under the Screenshots folder in the Pictures library.
Fn + Alt + Print Screen Keys:
These keys take the screenshot of the current window just like in the standard keyboard where you press the Alt + Print Screen.
Other Microsoft tablets like the Surface or Surface Pro with Windows 10 use different keyboard shortcuts and they do not have the Print Screen key button. However, this does not mean that if you are using these devices you do not get to take a screenshot. Microsoft provides the below shortcuts for Surface devices with Windows 10 operating systems.
Function (Fn) + Spacebar
Pressing the above keys gives you an opportunity to take a screenshot of your current window, copy it to the clipboard for you to paste it into any photo-editing program that allows you to edit and save.
Function (Fn) + Alt + Spacebar
Enables you to make a screenshot of the active screen, then copy it to the clipboard, and then paste it to an image editor program like Paint where you can edit and save the screenshot.
In conclusion, as we have seen above various ways allow you to take screenshots and even share on different platforms such as Email or Facebook without necessarily having to install a third-party program.